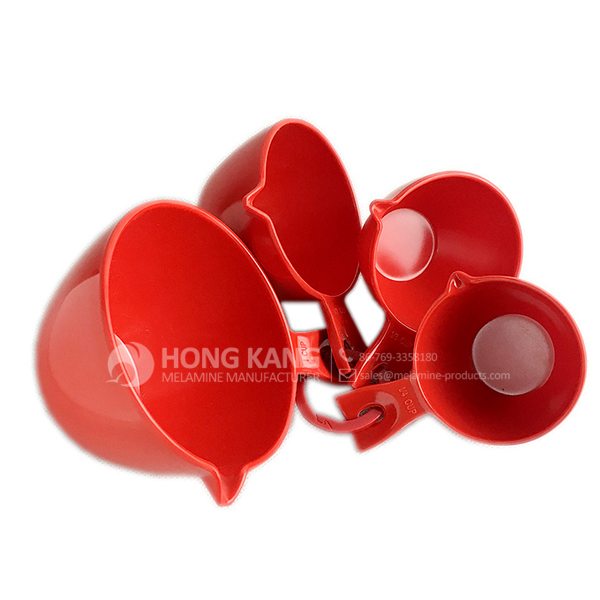
Factory Supplier for melamine two tone cups Export to Panama

Factory Supplier for melamine two tone cups Export to Panama Detail:
| Specification | |
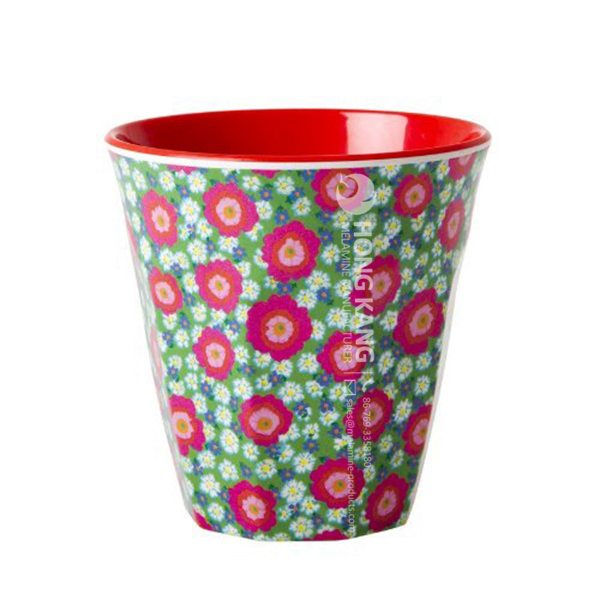
| Item Name | 380ml Melamine Two Tone Cups |
| Item No. | CP007 |
| Shape | Round |
| Body Color | Coloful |
| Decal Color | 4 colors print (if need) |
| Finish | Glossy |
| Style | Fashion |
| Motif Design | Customized |
| Shape Design | OEM/ODM |
| Test Standard | FDA,PROP 65,EN71,LFGB etc. by SGS or ITS |
| Packaging | 6pcs/box,72pcs/carton |
| Dimensions | |
| Length | 9 cm |
| Width | 9 cm |
| Height | 9.2 cm |
| Capacity | 380 ml |
| Material | |
| Body Material | 100%melamine |
| Decal Material (if need) | 4 colors print (CMYK), or spot color printing, RoHS certificate |
| Imprint (if need) | Seiko ink type 1000 or other type, RoHS certificate |
| Accessories Information | |
| Lid included | No |
| Other | No |
| Weights | |
| Net Weight (kg) | 7 |
| Shipping Weight (kg) | 8.2 |
Product detail pictures:

Related Product Guide:
Choosing The Best Dog Bowl and Feeder for Your Dog
Affordable Types of Dinnerware Sets
Gaining customer satisfaction is our company's aim forever. We will make great efforts to develop new and top-quality products, meet your special requirements and provide you with pre-sale, on-sale and after-sale services for Factory Supplier for melamine two tone cups Export to Panama, The product will supply to all over the world, such as: America , Morocco , Paraguay , We attained ISO9001 which provides solid foundation for our further development. Persisting in "High quality, Prompt Delivery, Competitive Price", we have established long-term cooperation with clients from both overseas and domestically and get new and old clients' high comments. It is our great honor to meet your demands. We are sincerely expecting your attention.
FAQ: 1.Q: Where is your factory located? How can I visit there? A: Our factory is located in Guangdong province, China. Warmly welcome to visit us! 2.Q: What is the material of your products? A: The material is melamine. 3.Q: How can I get some samples? A: We can send the samples by Express/DHL/FedEx/UPS etc. 4.Q: How does your company do regarding quality control? A: We have a very strict QC system. Our inspectors have been closely monitoring the production process from the selection of raw materials to the final step of the finished products. 5.Q: Can you print our logo on the product & packing? A: Yes, We can print your logo on our products. 
| * Do Not Touch On Fire Directly | |
|---|---|
| * Do Not Washing By Steelwire Ball | |
| * Non-Microwave Ovens | |
| * Dishwasher Safe |
This video is pulp molding machine to produce egg tray, just change the mold in the forming system, this kind of machine also can produce bottle tray.
Other product are egg carton, egg box, egg tray, fruit tray, bottle tray, paper shoe stretcher, agricultural seedling tray, industrial production packing, paper medical disposable trays etc..
Our website is www.eggtraymachine-sh.com / More informations about the machine please send email to: vanillashuanghuan@shjxsbkf.com.cn vanillashuanghuan@gmail.com / Phone Number: 0086-15673277080 / Skype: vanilla.ling
Check out how I made a laminated longboard for my wife using a vacuum bag and a wet/dry vac!
Subscribe to my channel: http://bit.ly/1k8msFr
Be sure to check out the X-Carve 3d carving machine from Inventables!
http://www.inventables.com
MORE PROJECTS, POSTS AND EVENTS
http://www.iliketomakestuff.com
HERE’S WHAT YOU’LL NEED:
http://amzn.to/1VkPGSl – Wood glue
http://amzn.to/1jvVuHG – Cutting mat
http://amzn.to/1NZmmLh – Table Saw
http://amzn.to/1KEhDfK – Spray Lacquer
http://amzn.to/1h44qCe – Super 77 spray adhesive
http://amzn.to/1VoWMQt – Silhouette Portait (vinyl cutter)
http://amzn.to/1VoWXLz – Truck/Wheel combo
http://amzn.to/1FF31OD – Grip tape
http://www.roarockit.com/tap-kits.html – Thin Air press bag
http://www.roarockit.com/veneer-1/ – Veneer pack
http://meshcam.com/ – MeshCam
http://www.123dapp.com/design – 123d Design
Want to support ILTMS? Get early viewing, exclusive content and more…
http://www.iliketomakestuff.com/patreon
FOLLOW:
http://twitter.com/iliketomakestuf
http://instagram.com/iliketomakestuff
http://facebook.com/iltms
I brought each one into MeshCam and created a very simple tool path for the X-Carve to follow.
Using a 2×2′ sheet of 1″ insulation, I cut it right down the center.
I covered the entire surface with Super 77 spray adhesive and let it dry for a few minutes.
I folded the pieces together, effectively making a 2″ piece of foam.
I put the largest bit I had in my X-Carve, a 1/4″ ball nose bit.
I screwed the foam panel into the waste board.
I ran the tool path for each half on a different foam panel.
After removing all of the surrounded, unwanted foam the two pieces fit together, but didn’t line up exactly.
I attached the two panels to a piece of melamine with spray adhesive.
The pieces lined up and I made sure they were secure to the melamine.
I smoothed out the transition with a rasp in no time flat.
The entire foam surface was covered with pacing tape to prevent damage to the foam in the lamination process.
I measured the profile of the board shape, edge to edge.
The veneer sheets I got were much larger than necessary, and they come with grain going in different directions for strength.
I trimmed all of the sheets to length.
Then I ripped them all down to fit the size of my form.
I sandwiched the veneers, fully covering each with glue, and making sure to alternate grain direction between layers.
I held the edges together with some packing tape so they wouldn’t slip around because of the glue.
I slid the sandwich and the form into the vacuum bag, being careful not to snag the bag on anything.
Over the sandwich, but under the bag valve, I slid in a strip of nylon mesh. This helps make sure the valve doesn’t get blocked before the vacuum is complete.
The end of the bag was sealed up with some very sticky black glue/tape.
The shopvac hose fits over the valve, and when turned on, it pulls out almost all of the air.
I switched over to the included hand pump to pull out the last bits of air.
After it dried for 8 hours, I pressed the valve to release the vacuum.
Next, I flipped the paper over and traced the shape to the other side.
This gave me a complete, symmetrical template to use.
I drew a center line and added a light coat of spray adhesive to the blank.
I added the template by lining up the crease with the center line.
Then the other side laid over into place as well.
I used a bandsaw to cut out the shape, but you could also use a jigsaw.
I smoothed out my bandsaw cuts with a belt sander.
I used an orbital sander to give the edges a very slight round over.
Since I used a light coat of spray adhesive, the template pulled off easily.
I lined up the trucks, and used a straight edge to make sure they were lined up with each other, then marked the holes for each.
I added a block underneath to prevent blowout, then drilled all eight holes.
I assembled the wheels and trucks, which is extremely simple.
I cut out some graphics on my vinyl cutter to use on the bottom of the board.
After peeling away the extra, I added a sheet of transfer paper over the remaining vinyl.
Then using a utility knife, I cut the individual stickers out.
I peeled off the backing from the vinyl, which leaves it attached to the transfer paper.
Then I masked off the areas along that border with blue tape.
I put down a few coats of black spray paint in the exposed areas.
After drying, I removed the tape.
The bottom surface was protected with a couple of coats of spray lacquer.
I got some red grip tape. I peeled off the backing and rolled it over the top surface, making sure not to let bubbles form underneath.
I ran a screwdriver around the edge to score the grip tape.
The scoring mark helps to make the cut cleaner. I cut off the excess with a utility knife.
I poked through, from the under side in each of the eight truck holes.
The riser pad slides over the screws before adding the truck and nuts. Second channel: bit.ly/iltms-2
It can be said that this is a best producer we encountered in China in this industry, we feel lucky to work with so excellent manufacturer.